ESSENTIAL
DIGITAL CAMERA FEATURES FOR TRAVEL |
| - suitable physical
size and camera weight for your needs (keep in mind that small, light cameras
are easier to carry with you at all times) |
| - good quality
- higher resolution (6 or more Megapixels) is better for larger prints |
- easy to
use camera (when traveling you seldom have time to look up the manual) |
| - fast startup
time (while traveling you often have to be quick) |
| -
low latency or shutter lag (short delay) between pressing the shutter and
recording the image |
| -
fast recycle time (how long after one photo before the camera can take another) |
| -
easily disabled flash (flash photography is banned in many art galleries,
cathedrals, etc) |
| -
good capability of capturing images in low light |
| -
(please email me additional suggestions) |
| NOTE:
In Australia it is possible to buy a duty paid digital camera prior to leaving
the country (so that you can learn how it works) and then have the already
paid duty refunded at the Australian departure point (overseas tickets are
required at the time of purchase). |
The
big problem with a digital camera on a holiday is often not the camera - it
is storage of the photos! Before the end of an
exciting first week of a trip you may find all your memory cards are full! Before
the trip you need to estimate how many photos you would typically take and buy
a suitable number of larger (512 MB or higher, $50-$100 each) memory cards.
If you are a 'mad keen shutter bug' or have an 8-12 Megapixel digital camera
then consider the larger capacity and higher speed 1-4 GB cards (from $100-$400
each). To avoid needing to buy additional memory cards while travelling consider
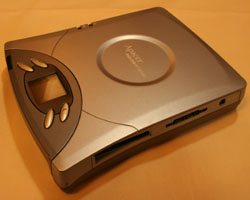
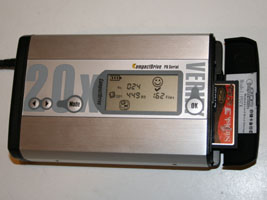
some other options before leaving home. One option is portable photo
storage devices such as compact portable CD burners or portable mini
hard drives that accept most common digital camera memory cards. Another option
with some music players (e.g. iPod) is to connect via special cable to your
digital camera. Most of these devices can be run for a short time off batteries
but are best run from a power outlet if one is available. Some models include
colour LCD displays for viewing photos (e.g. Epson P-5000 multimedia photo viewer)
while others only have an LCD window to confirm file transfer of your photos
from the camera - see below for more details and links to a range of models.
|
|
portable
CD burner |
portable
hard drive |
For
easy and fast emailing home of images or uploading of many photos to a web site
consider using one of the new miniature digital cameras or even a mobile phone
cam - these generally have smaller file sizes so no resizing is required for
email - the picture quality is usually fine for viewing on a computer screen
or TV. Although small file sizes usually mean lower print quality you could
also take along a compact, relatively cheap traditional film camera for situations
requiring high quality prints for the photo album.
No matter
what memory cards you buy they can still all be filled up on a long trip! Microdrives
are available but are not supported by all digital cameras models, particularly
the lower specification models. If you are travelling to major cities then photo
kiosks may support the burning of CDs containing all the photos on your memory
card - in this case 512 MB cards are ideal as they allow an efficient number
of photos for writing to a CD. Some Internet kiosks also allow you to burn your
own CDs - make sure you take your digital camera USB download cable and enough
blank CDs with you (they can be quite expensive in some tourist locations).
Most people preparing to travel have a limited budget so cost is very important.
There are many good quality digital cameras available for under $500 but do
not spend all of your money on the camera! (all prices shown are in Australian
$)
A 4
Megapixel camera will provide very good quality post card sized images - when
you print your best digital shots on photo paper they look great - just like
a traditional camera. Most 4-8 Megapixel cameras can be set to lower resolutions
to fit on more images but still leaving you the option of changing settings
for any high resolution 'super poster shots' that you may see on your trip.
To conserve memory card space you need to delete any poor photos along
the way. CAUTION:
study the commands on your camera for deleting photos very carefully - there
is often only one or two clicks difference between deleting one poor photo and
DELETING EVERY PHOTO! On most digital cameras any great photos can be marked
as 'PROTECTED' - this avoids you accidentally deleting images of a magic moment
on your trip. If you are staying with friends or in a major hotel then the TV
may accept input from your digital camera via the AV cable - it is easier to
review photos on a TV than on the usual 3-5 cm LCD screen on the back of your
camera.
ESSENTIAL
DIGITAL CAMERA ACCESSORIES FOR TRAVEL |
| - good carry
bag (quality bags with spare pockets and padding are not expensive) |
| - long life
rechargeable battery (or a very energy efficient camera using AA batteries) |
| - spare rechargeable battery or spare set of AA batteries |
| -
at least 2 x 1 GB memory cards but as much as you can afford - also consider
1 x 512 MB memory card (easy to 'select all' photos on a 512 MB card and
burn to a CD) |
| - cleaning kit
including microfibre cloth |
| - instruction
manual for your camera model |
| - international
adapters, leads and chargers (for charging batteries) |
OPTIONAL
ACCESSORIES |
| - USB and AV
leads for your digital camera |
| - spare rechargeable
digital camera battery (or alkaline batteries for some models) |
| - the instruction
manual (helps you get the best photos and avoid silly mistakes) |
| - mini tripod
or small bean bag (allows positioning of camera for time delay or low light
photos) |
| - infrared or
cable based remote shutter release (to prevent camera shake - low light
situations require long shutter times) |
| -
(please email me additional suggestions) |
After
confirming all photos are 'safely' backed up they can then be deleted from the
memory cards so you are ready for the next day. In some cases you may wish to
keep a few of the very best photos 'PROTECTED' on the memory card. My most recent
success in storing photos while travelling has been with a 2 GB Compact Flash
memory card and a portable hard drive. Another person on the trip had similar
success with a portable CD/DVD burner. A notebook computer with built in CD-R
or DVD-R gives greater flexibility with easy editing and backups of your priceless
holiday snaps - but notebooks are expensive, bulky, attractive to thieves and
can be a bother on some trips.
When
you return home you need to organize all your trip photos. If you have been
deleting poor photos along the way you can probably just take all of your memory
cards to a photo kiosk and print every photo at postcard size. However for greater
efficiency copy all of your trip photos onto a computer and scroll through them
at full screen size - it is worthwhile spending some time selecting the best
photos and then copying them into a BEST PHOTOS folder. Some photos will benefit
from cropping but keep the aspect ratio constant (e.g. 4:3 or 3:2). Even your
best photos may still benefit from modern software e.g. removal of red eye,
smart sharpen, correction of camera lens barrel distortion, adjustment of colour,
modification of brightness, shadow or highlight, etc. Make sure you
make backup copies of your organized photos!
SUGGESTIONS
FOR SHARING YOUR TRIP PHOTOS |
| WHO: |
| Family,
friends, work colleagues. Also consider sharing your travels with interested
people in local nursing homes, seniors centres, etc. (they can appreciate
your travel experiences but think considerately about your audience - not
too long, good sized images, add some music - make a show that's fun for
folks not able to travel). |
| HOW: |
|
-
show people your photos full screen on the nearest computer (the larger
image is much easier to see than a traditional postcard sized print)
- email your friends some sample trip photos (use modest file sizes for
friends on broadband or very small file sizes for friends on dialup)
- show people traditional printed postcard sized photos (option of white
border can allow space to print key photo details)
- print some of your best photos in colour at A4 or A3 size using a budget
printer and good quality white paper (easy to store in plastic pockets
in a binder that can be handed around, saves some people looking for their
reading glasses)
- use a laptop with a data projector to have a huge slideshow on a light
coloured wall
- print any great travel photos at poster size (e.g. 75 x 50 cm) and hang
them on a wall
(our family has a set of framed poster sized photos displayed in different
houses each month)
- load your favourite photos into a Kodak Easyshare Picture Viewer and
show them to others via the 6 cm colour screen
|
| WHEN: |
| Anytime
if you keep your photos handy!
|
| - upload your
best photos - either to your own web site using modest file sizes (e.g.
400 x 300 pixels) or using online photo sharing sites (e.g. PBase, Picasa,
Ofoto, Picture Trail, Shutterfly, Snapfish) |
| - keep your
best photos with you on a flash drive (can carry trip photos in your pocket) |
| - burn the best
photos to a CD or DVD |
| - have your
best photo prints stored in a post card sized 'brag album' |
| -
set your computer screen saver to automatically scroll through photos of
your trip |
| -
frame your best photos and hang them on a wall |
| -
(please email me additional suggestions) |

SUMMARY
OF OPTIONS FOR TRAVELLING WITH A DIGITAL CAMERA:
1. Take a portable mini hard drive with you,
they typically store 40-160 GB ($200-$1000) e.g. HyperDrive http://www.hypershop.com/shop/,
X - Drive http://www.powerinnumbers.com.au/,
Image Tank, I/OMagic Digital Photo Library http://www.dpreview.com/news/0304/03042901iomagicdrive.asp
or similar devices. A variety of models can be viewed at http://www.jaldigital.com.au/catalog/default.php?cPath=27
Note: if you can afford it some models also have outstanding colour screens
that allow close checking of your photos while still travelling e.g. Epson P-3000
or P-5000 Multimedia Storage Viewer (has a 10 cm super high density Epson PhotoFine
Ultra liquid crystal display) http://www.epson.com.au/products/multimedia/p5000.asp.
Look for USB 2 models as they typically allow faster transfer of photos.
- after a busy day download all photos direct from memory cards into the device
(use mains power or well charged batteries, some models include a car charging
option).
Note1: additional cost, hard drives are very sensitive to bumps - suggest transport
in personal luggage only and pack with sponge padding
Note2: remember you need a large enough hard drive to last until you get home
where you can transfer all photos to your computer for easy review. An immediate
backup at home is recommended (friends had their laptop computer stolen with
the travel photos just after returning home - fortunately they had also copied
the photos onto another computer).
2. Take a compact portable CD burner ( $300-$500,
typically stores 500-700 MB) or DVD burner ($500-$1000, typically stores 4.5
GB) e.g. Apacer Disc Steno http://www.apacer.com/apacer_english/product_html/disc_steno_index.asp
- these special burners accept most common digital camera memory cards - portable
photo CD burner designed for photographers and travelers, no computer needed,
easy to copy data from memory cards, can also display photos by connecting it
to a television. USB 2 devices typically allow faster transfer of photos.
- after a busy day burn all photos direct from memory cards onto a blank disk,
some units will automatically sequence (span) your photos over multiple disks
if you have very large memory cards full of high resolution photos.
Note: additional cost, CD/DVD burners are sensitive to bumps - suggest transport
in personal luggage only, also need to carry blank disks
3. Use a camera link connecting cable to download
all photos to your music player (e.g. MP3 player, iPod, iPod Video)
Note: additional cost, some units do not confirm the successful file transfer
of photos
4. Take a notebook computer on the trip - after a
busy day download all photos to the notebook via a memory card adapter, USB
card reader or USB cable (and charge all batteries).
Note: weight of notebook, risk of theft, keeping notebook battery charged
5. Take a USB card reader, blank CDs
and visit cyber cafes or friends with CD burners in their computers.
Note: not always available
6. Take your photos on memory card to a digital photo lab
that will print images onto photo paper or CD.
Note: can be very expensive at tourist spots, sometimes restrictions on number
of photos that can be copied at once, not readily available in some locations
7. Use a web based email program to email photos home
e.g. Google's Gmail service where users are allowed up to 2 GB of permanent
storage.
Note: requires reasonable bandwidth, web access can be costly in some tourist
locations, some web email services have low storage limits or only allow temporary
storage e.g. one month
8. If staying in a hotel you can play back recent photos on
the TV and delete any unsuitable ones - it is easier to see the real
quality of your photos on a larger screen - however practice this before traveling
at home on your own TV and also at friends places - not all TVs or VCRs are
easy to use - you may need to toggle between TV/AV1/AV2/DVD or similar choices
on the remote.
Note: cost of hotel accommodation, unlike homes many European hotel TVs do not
have AV connections (restricted or require an RCA converter with an antenna
style plug), TVs are not readily available in some remote tourist locations
9. Buy a camera or camcorder with mini CD or DVD storage (writes
still photos direct to disk).
Note: can be expensive, slower between photos than memory cards
10. Buy a cheap disposable camera or compact film based camera
- film is available worldwide.
Note: limited image quality on some models, you pay for processing of your photo
mistakes!
CAUTION: Avoid any consumer digital camera that requires special software
to upload or process photos - standard jpegs are simplest for travelling. If
you are using a Digital SLR camera and wish to use RAW format make sure you
practice before leaving and understand the very large file sizes involved.

Site
Credits: This site is to help the 80% of people who just want technology
to be easy to use and reliable. Simon Evans, Donna Chambers, Bryn Jones, Lui
Scaldaferro, Bruce Jenkins, Bob Kuesthave and Scott Bradley have provided assistance
and information. Please take the trouble to offer ideas or suggestions - you
will be acknowledged and others can benefit. The site is intended to be free
of bias and receives no commercial gain from any party. Hyperlinks are checked
and this information is updated regularly based on feedback, published articles,
new experience, Internet research and new products.
*
Note : please email me if you have any other suggestions for coping with digital
cameras while travelling
View some of my favourite photos: flying, birds, flowers,
sunsets, fireworks, ...